Automatically Discover and Highlight PII in PDF
Hong Lin Published Apr 28, 2023 #iDox.ai#
PII stands for personally identifiable information. It is defined as:
(1) any information that can be used to distinguish or trace an individual‘s identity, such as name, social security number, date and place of birth, mother‘s maiden name, or biometric records; and (2) any other information that is linked or linkable to an individual, such as medical, educational, financial, and employment information
Businesses need to take necessary measures to manage PII confidentially. The consequence of the PII leak is serious. It will result in heavy fines. You can find more PII information from our previous posts on Medium (Link1 and Link2).
In this article, we will show you how to use Postman to learn the iDox.ai Document API to automatically highlight PII in a PDF. You will see how easy it is to build an automatic PII highlight workflow with only 4 APIs. Our PII discovery API supports 31 entity categories across the US, UK, and Australia. After reading this article, you will know how to add PII discovery for your needs.

Postman is an application for testing APIs. It provides a simple UI and allows anyone to make API requests without writing any code.
The iDox.ai Document API provides several intelligent services for document processing, including
- Discover, highlight, and redact PII in a PDF and MS Word (doc and docx) file.
- Classify a document by its contents.
- Identify the type of contract.
- Check completeness of a contract.
For the general flow of using these services:
- Call upload document API to upload a file and get a job Id
- Call find job status API with the job Id to get a document Id
- Call any of the document intelligence APIs with the document Id
- Call download document API to get the processed document
Create an iDox.ai API developer account
Before starting to use the iDox.ai API, you need to obtain an API key by creating a developer account on iDox.ai.
1. Visit the iDox.ai developer center. Click Create a Developer Account.

2. Register a developer account. After sign-up, you will receive an activation email with a link to verify your registration.


3. To get an API key, you have to create an organization and then a project. Click New Organization in the left sidebar to create an organization. Then click Create a new project to create a project under the organization.


4. After a project is created, click the project panel to go to the project view. In the project view, click Key Management in the left sidebar to open the key management view. Click Generate to create an API key.

Step-By-Step Guide to Build the PII Detection Workflow
Next, you will visit the Postman website to start testing API by using the Collection created by the iDox.ai team. Type “iDox.ai” in the top search bar. You will find the public workspace “iDox.ai Document API”. You need a Postman account for testing APIs on Postman.

Click Create a fork in your Postman workspace.


1. Copy the API key you created in the iDox.ai developer console and paste it into the Postman. Select the Variables tab of the iDox.ai Document API collection. Paste the key in the CURRENT VALUE column of the variable idox_api_key_value.

2. Move to the upload document API view. Click the Body tab and click Select Files to add the file for analysis. The file format can be a PDF, DOC, or DOCX. In this example, we will upload a PDF file because currently the highlight feature only supports PDF. Click Send to make a request.

This API triggers several backend services to process the uploaded file. The text contents are extracted. If it is a scanned file, the OCR service will be triggered. The layout analysis service applies AI to detect the boundary of each paragraph.
If the upload is successful, a response body similar to the image below is returned. Copy your jobId value in the response body for accessing the Find job status in the next step.

3. Move to the find job status view. Paste the jobId in the last step in the job-id of Path Variables. Click Send to make a request.

The response body will then be returned. You need docId in the response body for many document processing APIs.

4. Move to the PII discovery folder. There are 4 PII discovery API variants. For this example, we use the document PII discovery API to find PII in the uploaded file. Paste the docId from the previous step in document-id of the Path Variable section.


Before clicking Send, let us review the supported entity categories by clicking the Document icon in the right sidebar. They are listed in the table Entity Categories. It is the link to the entity category list.

Click the Body tab and change the categoriesFilter in the request body with the entity categories you want to detect. In this example, we use Person and PersonType for detecting person names and person roles.

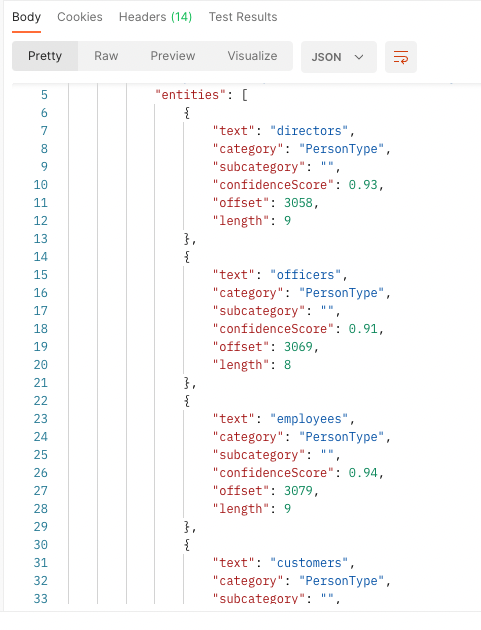
Click Send and wait a few seconds, the response body is returned with a list of the detected paragraphs and PII entities. The example below shows some of the detected entities.

5. In this step, we will highlight the detected PII in the uploaded file. Move to the redact document API. Before using this API, we need to rearrange the output in the last step in JSON format to the request body. Below is the sample JSON. The highlight variable controls to redact (false) or highlight (true) text. You will create a similar JSON with the entities returned from the previous step.

Paste your docId from the last step in the path variable document-id and the JSON text into the request body under the Body tab. Click Send, after a few seconds, the highlighted PDF is shown in your web browser.

Please visit the iDox.ai Developer Center to create an account. You can use 1000 cool APIs for free. You can also access API documentation on Postman.
You can start to experience our smart document technologies with iDox.ai Suite, which is a bundle of web apps, without writing any code. It’s free to start with the basic plan.
Feel free to drop your suggestions, feedback, and questions in our Slack support channel. You can also leave your messages down below. We love checking them out.


